记录一下在 TrueNAS 上面折腾 GPU 直通的过程。本文的时间时2024年10月,VM用的是 Ubuntu Nobel 24.04。这类教程/步骤通常随着时间,正确性也会逐渐降低,所以还是把时间说清楚的好。
平台:Asus B460M, Intel i3 10100, Nvidia 3070。完全的消费平台。
Actually there is not much about TrueNAS, but more about Nvidia Drive on Ubuntu 24.04
TIP
之前也有在 Proxmox 7.4 上面直通 GPU 的记录: [proxmox-74-gpu-passthrough]
Settings on TrueNAS
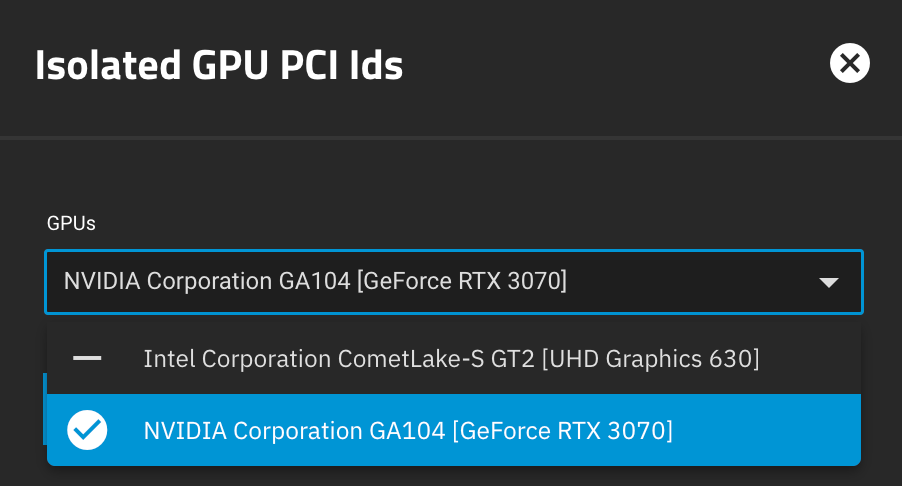
关闭TrueNAS,装显卡,开机。进入 System Settings → Advanced → Isolated GPU Device(s)。然后沮丧的发现,只有一个设备:你的Nvidia GPU。你尝试把这个GPU添加进 isolated GPU devices。然后系统提示不许,说这个设备目前被 TrueNAS 占用。于是你有疑问:我的 iGPU 哪里去了?为什么 TrueNAS 为什么不用 iGPU 偏偏要用 discrete GPU?
- 重启进 BIOS,此时你大概需要连一个显示器在 Nvidia GPU 上面(尽管你有 iGPU)。
- 然后在 BIOS 里面找 Primary Display 这个选项。通常在 Advanced Menu → Graphics Configuration 下面,选择 Internal Graphics。可以参考:https://www.asus.com/support/faq/1047413/
- 然后把 iGPU 的 multi-monitor 选项关闭。Multi-monitor 开启的时候,似乎没办法在 Application (就是那个基于k3s的玩意)里面分配GPU(导致 TrueNAS 上面的 Jellyfin 没法硬件解码)。可以参考:https://www.asus.com/support/faq/1045574/#bbb
- 然后把显示器接到 iGPU 的输出口上。而且在之后大概率要保持这个操作。要么接一个显示器,要么,接一个 Display Dummy。我发现如果我什么都不接,TrueNAS 还是会占用 Nvidia GPU。这可能是 ASUS BIOS 上面有 Bug?我这边是选择接一个 Dummy。
- 再次开机,这时候 Isolated GPU Devices 里面应该就是两个设备了。我们当然是 isolate Nvidia GPU 了。
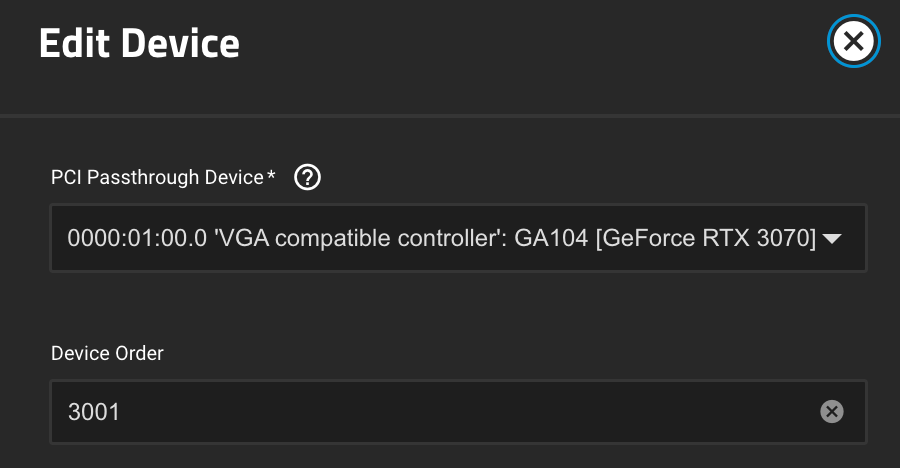
这之后就可以在 VM 设置里面添加 PCI 设备,把3070直通给某一个VM。
Install Drivers
这部分还是需要比较严格的根据 Nvidia 官方文档来的。只不过这个文档确实结构比较复杂,不是很好follow。所以这里干脆记录一下针对 Ubuntu 24.04 的情况。
Official Nvidia Driver Installation Guide
IMPORTANT
560 版本开始,Nvidia 似乎是打算推官方的开源驱动。所以在560 和 550 版本的驱动安装上,是有一点区别需要注意的。
WARNING
本文描述的是通过 package manager 安装驱动。但是历史更悠久,很可能更可靠,更快速的安装方式是 .run 文件安装。
卸载旧驱动
实测这个古老的命令还是可以继续用的:
asudo apt remove --purge '^nvidia-.*'
sudo apt remove --purge cuda-toolkit
只不过这个同样会把 nvidia-common 也卸载掉。它是 ubuntu-desktop 的依赖项。如果是 server 的话,无所谓,如果是 desktop 的系统,估计还需要 apt install ubuntu-desktop 重新补齐需要的组件。
- Reference 1: https://askubuntu.com/questions/206283/how-can-i-uninstall-a-nvidia-driver-completely
- Reference 2: https://github.com/deeperlearner/linux-recipes/blob/master/notes/gpu_setup.md
安装Nvidia的Package Manager
最简单的安装驱动安装方法肯定是直接下载 .run 文件安装。但是 Nvidia 也提供了一套 Package Manager 来安装驱动以及管理后续的升级。这里采用 Package Manager 的方式。
首先验证系统:
# Confirm Arch. Assume it is x86_64
uname -m

# Check OS Distribution info
cat /etc/*release

# Typical Output for Ubuntu
DISTRIB_ID=Ubuntu
DISTRIB_RELEASE=24.04
DISTRIB_CODENAME=noble
DISTRIB_DESCRIPTION="Ubuntu 24.04.1 LTS"
PRETTY_NAME="Ubuntu 24.04.1 LTS"
NAME="Ubuntu"
VERSION_ID="24.04"
VERSION="24.04.1 LTS (Noble Numbat)"
VERSION_CODENAME=noble
ID=ubuntu
ID_LIKE=debian
HOME_URL="https://www.ubuntu.com/"
SUPPORT_URL="https://help.ubuntu.com/"
BUG_REPORT_URL="https://bugs.launchpad.net/ubuntu/"
PRIVACY_POLICY_URL="https://www.ubuntu.com/legal/terms-and-policies/privacy-policy"
UBUNTU_CODENAME=noble
LOGO=ubuntu-logo

# Verify gcc exits
gcc --version

# Verify Kernel Version
uname -r

# Example output:
6.8.0-45-generic

# Verify Nvidia GPU device
lspci | grep -i nvidia
# Example output:
00:07.0 VGA compatible controller: NVIDIA Corporation GA104 [GeForce RTX 3070] (rev a1)
Install package manager
# Install kernel headers
sudo apt-get install linux-headers-$(uname -r)

# Remove old keys (don't ask, just do it)
sudo apt-key del 7fa2af80

# Download the .deb package
# wget https://developer.download.nvidia.com/compute/cuda/repos/$distro/$arch/cuda-keyring_1.1-1_all.deb
sudo dpkg -i cuda-keyring_1.1-1_all.deb
# For this case:
wget https://developer.download.nvidia.com/compute/cuda/repos/ubuntu2404/x86_64/cuda-keyring_1.1-1_all.deb
# Install
sudo dpkg -i cuda-keyring_1.1-1_all.deb
Install CUDA SDK (this is not driver) and actually Kernel Modules
# Update apt cache
sudo apt update

# Install CUDA toolkit
sudo apt-get install cuda-toolkit

# Install GDS package (I don't know what are them)
# Install this and CUDA toolkit separately
sudo apt-get install nvidia-gds
# IMPORTANT: This step wil build the kernel module for Nvidia Driver!

# Then, reboot
sudo reboot now
WARNING
Check the Kernel Module version in the nvidia-gds step.
安装 Nvidia-GDS 的时候一定要注意一下 terminal output。找到类似东西:
The following additional packages will be installed:
  dkms linux-image-6.8.0-1014-nvidia-lowlatency
  linux-modules-6.8.0-1014-nvidia-lowlatency
  linux-modules-nvidia-550-server-open-6.8.0-1014-nvidia-lowlatency
  linux-modules-nvidia-550-server-open-nvidia-lowlatency
  nvidia-firmware-550-server-550.90.07 nvidia-fs nvidia-fs-dkms nvidia-gds-12-6
  nvidia-kernel-common-550-server nvidia-kernel-source-550-server-open
Suggested packages:
  menu fdutils linux-doc | linux-nvidia-lowlatency-source-6.8.0
  linux-nvidia-lowlatency-tools linux-headers-6.8.0-1014-nvidia-lowlatency
  linux-modules-extra-6.8.0-1014-nvidia-lowlatency mlnx-ofed-all
The following NEW packages will be installed:
  dkms linux-image-6.8.0-1014-nvidia-lowlatency
  linux-modules-6.8.0-1014-nvidia-lowlatency
  linux-modules-nvidia-550-server-open-6.8.0-1014-nvidia-lowlatency
  linux-modules-nvidia-550-server-open-nvidia-lowlatency
  nvidia-firmware-550-server-550.90.07 nvidia-fs nvidia-fs-dkms nvidia-gds
  nvidia-gds-12-6 nvidia-kernel-common-550-server
  nvidia-kernel-source-550-server-open
Here, the version is clearly: 550 。后面我们安装驱动的时候也只能根据这个 kernel 选定的 version 来。也许我们可以手动再升级到 560 (比如通过安装 nvidia-kernel-source-560-open 之类的)。但是毕竟有风险。
重启之后,如果你要用 CUDA 的toolchain,那么它们都在 /usr/local/cuda/bin/ 目录下。可以考虑 export PATH=/usr/local/cuda-12.6/bin${PATH:+:${PATH}} 如果有必要的话。
Install the Driver
550, 560 正是 Nvidia 新老路线交接的时候,所以需要特别注意一下。
- 560以及之后的,可以安装
nvidia-openornvidia-open-560 - 550 和之前的,就 driver 就是用以往的方式命名的:
nvidia-driver-550。
sudo apt install -V nvidia-driver-550-server-open

# Reboot. If you don't reboot, even though the driver major version and
# kernel module version does match, you will still get a 'version' not match
# error when running nvidia-smi.
sudo reboot now

# Run nvidia-smi to verify
nvidia-smi
所以我们这里就需要安装 nvidia-driver-550。如果错误安装为 nvidia-open(截止截稿,会映射成560),就导致之后运行 nvidia-smi 的时候失败。需要去 /var/log/syslog 文件里面搜索 nvidia 找错误原因。那里会显示 kernel module 和 driver 的版本不匹配。
NOTE
我在这里还遇到一个问题,就是重启之后,运行 nvidia-smi,报错:
NVIDIA-SMI has failed because it couldn't communicate with the NVIDIA driver. Make sure that the latest NVIDIA driver is installed and running.解决方法是
- Install
nvidia-cuda-toolkit如果还不行:- Reinstall headers:
sudo apt install --reinstall linux-headers-$(uname -r)很奇怪的是,之前是安装了 cuda-toolkit 的。所以我目前也不理解这两者之间是什么关系。而且之前也是安装了 header 的,也不明白为什么还需要再装一次。
Install Docker Toolkit
相比 Driver,这个就容易多了,官方的文档好理解多了。
如果还没有安装 docker 的话
Follow this link: https://docs.docker.com/engine/install/ubuntu/#install-using-the-repository
嫌麻烦的话,用 convenient script 也可以:https://github.com/docker/docker-install
curl -fsSL https://nvidia.github.io/libnvidia-container/gpgkey | sudo gpg --dearmor -o /usr/share/keyrings/nvidia-container-toolkit-keyring.gpg \
  && curl -s -L https://nvidia.github.io/libnvidia-container/stable/deb/nvidia-container-toolkit.list | \
    sed 's#deb https://#deb [signed-by=/usr/share/keyrings/nvidia-container-toolkit-keyring.gpg] https://#g' | \
    sudo tee /etc/apt/sources.list.d/nvidia-container-toolkit.list

sudo apt update
sudo apt install nvidia-container-toolkit
sudo nvidia-ctk runtime configure --runtime=docker
sudo systemctl restart docker
Verify with sudo docker run --rm --runtime=nvidia --gpus all ubuntu nvidia-smi in the VM.
至此,一个 TrueNAS 上面的,有 Nvidia GPU 的 VM 就算配置完成。